Understanding the Basics

A bathroom fan plays a crucial role in maintaining a healthy and comfortable environment in your bathroom. It effectively removes moisture, odors, and pollutants, preventing the buildup of mildew and mold, and promoting a fresh and clean atmosphere.
Types of Bathroom Fans
The selection of a bathroom fan depends on your specific needs and preferences. There are two main types of bathroom fans:
- Exhaust fans: These fans are designed to draw air out of the bathroom, effectively removing moisture and odors. They are typically mounted on the wall or ceiling, with a vent leading to the exterior of the house. Exhaust fans are the most common type of bathroom fan.
- Combination fans: These fans offer the functionality of both exhaust and ventilation. They typically include a built-in light fixture, providing both illumination and air circulation. Combination fans are a convenient and space-saving option for smaller bathrooms.
Components of a Bathroom Fan and Light Fixture
A typical bathroom fan and light fixture consists of several key components:
- Motor: The motor is the heart of the fan, responsible for powering the fan blades and creating airflow.
- Fan blades: The fan blades are designed to move air efficiently, creating a suction effect to draw air out of the bathroom.
- Switch: The switch controls the operation of the fan and light fixture. It can be a simple wall switch or a more sophisticated remote control.
- Wiring: The wiring connects the fan and light fixture to the electrical system of the house, providing power to operate them.
- Light fixture: Combination fans include a light fixture that provides illumination for the bathroom.
Safety Precautions and Best Practices
Working with electrical wiring requires caution and adherence to safety practices. Here are some essential precautions to take:
- Disconnect power: Before working on any electrical wiring, always disconnect power to the circuit by turning off the corresponding breaker at the electrical panel.
- Use appropriate tools: Utilize the proper tools for the job, such as wire strippers, crimpers, and voltage testers.
- Follow manufacturer instructions: Always refer to the manufacturer’s instructions for the specific fan and light fixture you are installing.
- Consult a professional: If you are unsure about any aspect of the wiring process, it is best to consult a qualified electrician.
Important Note: Never work on electrical wiring while the power is on. Always disconnect power before working on any electrical component.
Wiring the Bathroom Fan: How To Wire A Bathroom Fan And Light
Now that you have a good understanding of the basics, let’s dive into the process of wiring the bathroom fan. This section will guide you through the steps of connecting the fan’s wiring to the electrical box, understanding the different wire types and colors, and how to safely install and test your new fan.
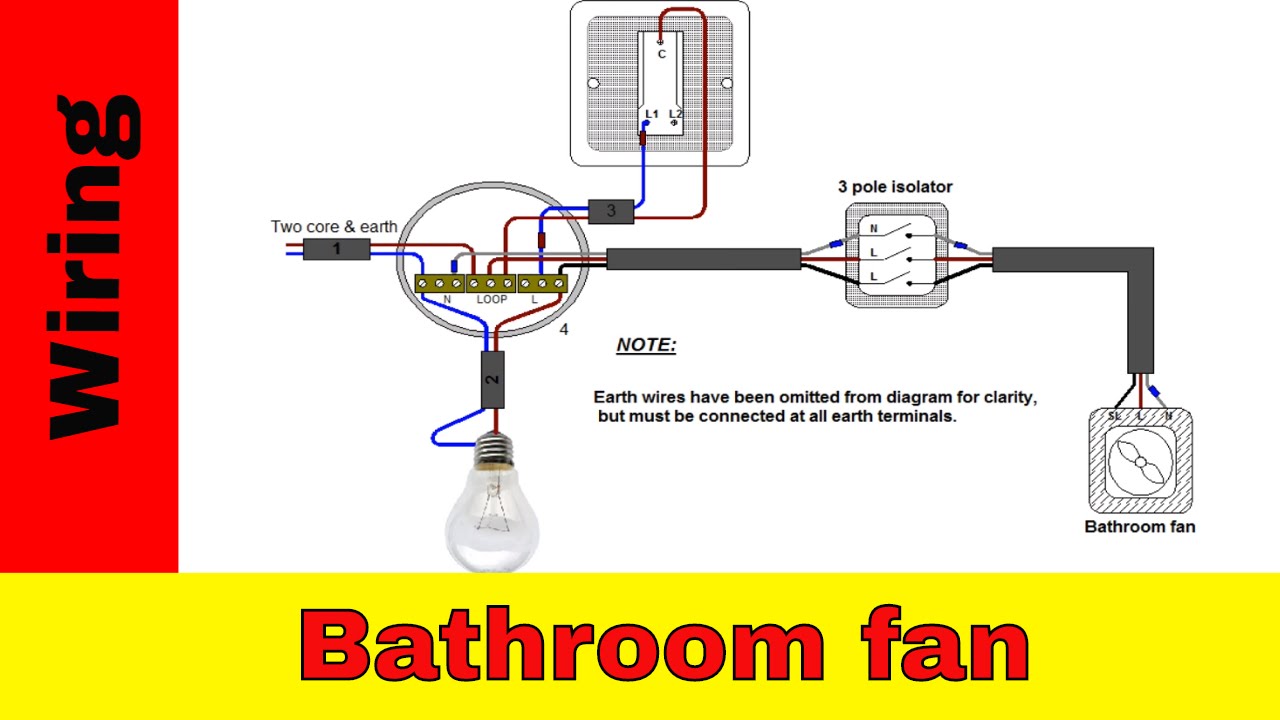
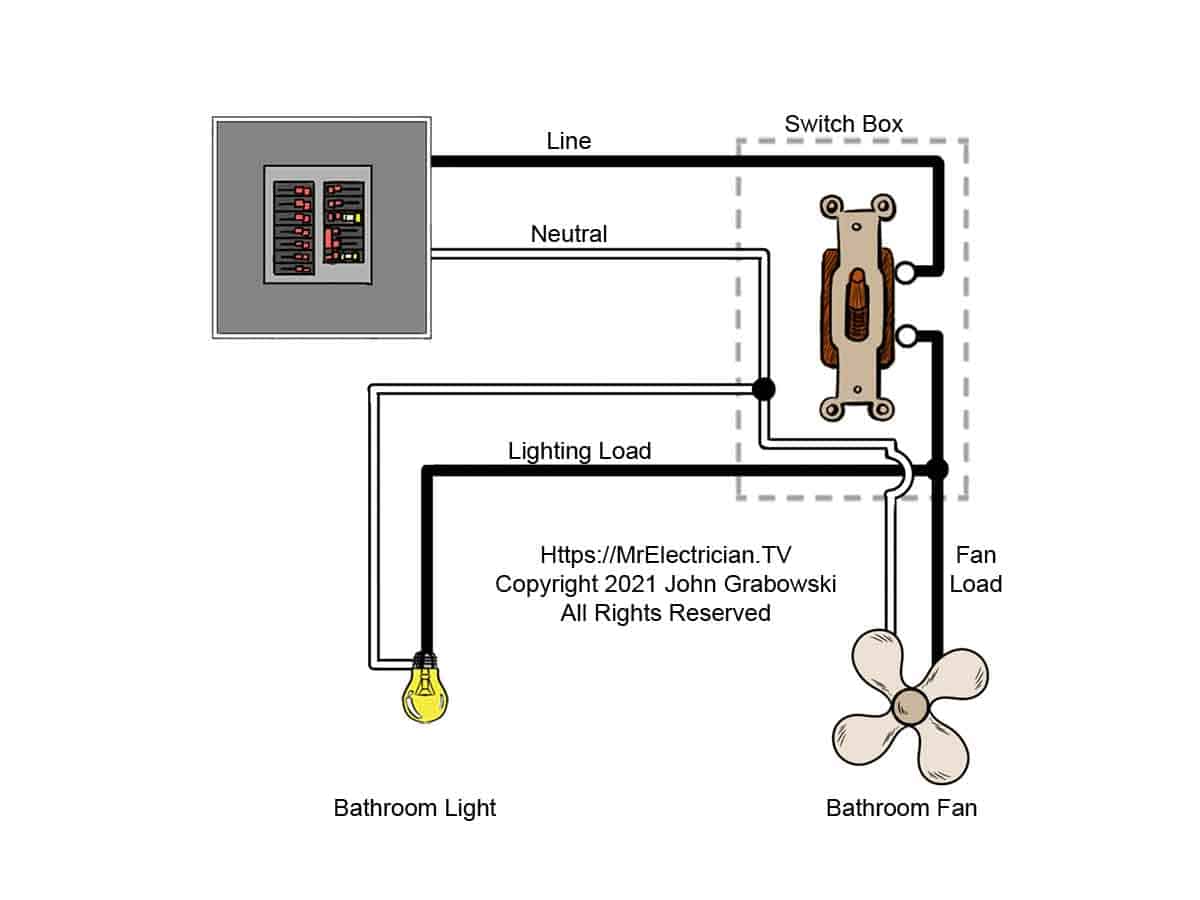
Connecting the Fan’s Wiring to the Electrical Box
Before you begin, it’s crucial to ensure the power is switched off at the circuit breaker. This is a vital safety precaution to prevent electrical shock. You will need to identify the wires in the electrical box and match them with the wires coming from the fan.
Here’s a breakdown of the common wire types and colors:
- Black wire: This is the “hot” wire that carries the electrical current to the fan.
- White wire: This is the “neutral” wire that carries the current back to the electrical panel.
- Green or bare copper wire: This is the “ground” wire, providing a safe path for electricity to flow in case of a fault.
To connect the fan’s wiring to the electrical box, you will typically use wire connectors, also known as wire nuts. These are small plastic caps that twist onto the wires, securely holding them together.
- Strip the insulation: Use a wire stripper to remove about ½ inch of insulation from the ends of each wire, both from the electrical box and the fan.
- Connect the wires: Match the wires based on their color. Connect the black wire from the fan to the black wire in the electrical box using a wire connector. Do the same with the white and green wires. Make sure the wire connectors are securely tightened.
- Secure the connections: Once the wires are connected, use a screwdriver to tighten the screws on the electrical box cover, ensuring the wires are securely held in place.
Installing the Fan and Light Fixture
After wiring the fan, you need to mount it to the ceiling. Most bathroom fans come with a mounting bracket that attaches to the ceiling joists.
- Attach the mounting bracket: Use screws or nails to secure the bracket to the ceiling joist. Ensure the bracket is level and securely fastened.
- Mount the fan: Align the fan with the mounting bracket and secure it using the provided screws or clips. Ensure the fan is level and securely mounted.
- Install the light fixture: If your fan has a built-in light fixture, follow the manufacturer’s instructions for installation. This typically involves attaching the light fixture to the fan housing and connecting the wiring.
Testing the Fan and Light Fixture
After installation, it’s essential to test the fan and light fixture to ensure they are working correctly.
- Turn on the power: Carefully turn the power back on at the circuit breaker.
- Test the fan: Flip the switch to turn the fan on. Check if the fan is running smoothly and at the desired speed.
- Test the light fixture: If your fan has a light fixture, turn on the light switch and ensure the light is working properly.
If you encounter any issues during testing, double-check your wiring connections and consult the fan’s instruction manual for troubleshooting tips. It’s always a good idea to seek professional assistance if you are unsure about any part of the installation process.
Troubleshooting and Maintenance
Even the best bathroom fans require occasional maintenance to ensure optimal performance and longevity. Understanding common issues and preventative measures can help you keep your fan running smoothly for years to come.
Troubleshooting Common Issues
Identifying the source of a problem is the first step to resolving it. Here are some common issues you might encounter with your bathroom fan and how to address them:
- Noise: A noisy bathroom fan can be a nuisance. The most common causes include:
- Worn Bearings: Over time, the bearings that support the fan motor can wear down, causing grinding or rattling noises.
- Loose Components: If the fan blades, motor housing, or other components are loose, they can vibrate and create noise.
- Obstructed Airflow: A build-up of dust, lint, or other debris in the fan housing or vent can restrict airflow and cause the motor to work harder, resulting in noise.
- Lack of Airflow: If your bathroom fan doesn’t seem to be moving air effectively, there are a few possible culprits:
- Clogged Vent: The vent leading from the fan to the outside can become blocked with debris, preventing proper airflow.
- Faulty Motor: A malfunctioning motor may not be able to provide sufficient power to the fan blades.
- Defective Fan Blades: Damaged or warped fan blades can reduce airflow efficiency.
- Light Problems: If the light in your bathroom fan fixture is not working, check the following:
- Bulb: The most common reason for a non-working light is a burned-out bulb.
- Wiring: A loose or faulty connection in the wiring can interrupt the flow of electricity to the light bulb.
- Switch: The light switch itself may be malfunctioning, preventing the light from turning on.
Routine Maintenance
Regular maintenance is crucial for keeping your bathroom fan running smoothly and efficiently. Here’s a checklist for routine tasks:
- Cleaning: Dust and debris can accumulate in the fan housing and vent, restricting airflow and reducing efficiency. To clean your bathroom fan, follow these steps:
- Turn off the power to the fan at the circuit breaker.
- Remove the fan cover and carefully remove the fan blades.
- Use a vacuum cleaner with a brush attachment to remove dust and debris from the fan housing, blades, and vent.
- Wipe down the fan housing and blades with a damp cloth.
- Reassemble the fan and test it to ensure it is working properly.
- Lubrication: The bearings in the fan motor can benefit from occasional lubrication to reduce friction and noise.
- Use a light oil specifically designed for electric motors.
- Apply a few drops of oil to the bearing points, following the manufacturer’s instructions.
Replacing Worn or Damaged Components, How to wire a bathroom fan and light
Over time, some components of your bathroom fan may wear out or become damaged. Identifying and replacing these parts can help restore proper function and extend the life of your fan.
- Fan Blades: If the fan blades are warped or damaged, they can reduce airflow and cause noise. Replace them with new blades of the same size and type.
- Motor: A faulty motor can cause a variety of problems, including lack of airflow, noise, and overheating. If you suspect a motor issue, it’s best to consult a qualified electrician for diagnosis and replacement.
- Vent: If the vent leading from the fan to the outside is clogged or damaged, it can restrict airflow and reduce efficiency. Replace the vent with a new one or have it professionally cleaned.
Extending Fan Lifespan
With proper care and maintenance, your bathroom fan can last for many years. Here are some tips for extending its lifespan:
- Regular Cleaning: As mentioned earlier, regular cleaning is essential for preventing dust and debris buildup that can damage the fan motor and reduce airflow.
- Proper Ventilation: Ensure that the vent leading from the fan to the outside is clear and unobstructed to allow for proper airflow.
- Avoid Overheating: Excessive heat can damage the fan motor. Make sure the fan is properly installed and that there is adequate ventilation around it.
- Use High-Quality Components: When replacing worn or damaged parts, use high-quality components that are compatible with your fan model.
How to wire a bathroom fan and light – Wiring a bathroom fan and light is pretty easy, but you gotta know what you’re doing, ya know? Like, if you need to replace the whole fan, you gotta know how to remove the old one first. Check out this guide on how to remove bathroom fan before you go messing with anything.
Once you’ve got that down, hooking up the new fan is a piece of cake.
Wiring a bathroom fan and light is super easy, but it’s best to check out some tutorials first. You know, like, maybe get some inspo from a Pinterest board or something. And hey, if you’re going for a modern vibe, you could totally rock a grey bathroom! Check out these grey bathroom ideas small spaces, they’re totally lit.
Anyway, back to the fan and light thing, you’ll need to make sure you have the right size wire and stuff. It’s all about making sure your bathroom is both functional and fire-safe!
